SmartConsole is comprised of several clients, used to manage the Check Point security environment.
SmartDashboard
SmartDashboard is the SmartConsole client that lets you manage security policies and network objects.
In SmartDashboard, you can manage all aspects of your network security. The settings defined in the various tabs are applied to gateways and/or endpoints to enforce the security that you choose to implement.
The tabs that you see in the SmartDashboard may depend on the Software Blades that you have deployed
* Firewall - In this window you can see the important current data for the Firewall Software Blade and its Security Gateways.
* Application Control and URL Filtering - In the Application and URL Filtering Overview pane, you can quickly see the status of computers and incidents. Use the windows for the most urgely or commonly-used management actions.
* Data Loss Prevention (DLP) - In this window you can quickly see the status of DLP Security Gateways and Exchange Security Agents. You can also see incidents and access the windows for the most urgent or commonly used management actions.
* IPS (Intrusion Prevention System) - In this window you can quickly view and handle urgent security issues that deal with IPS management.
* Threat Prevention - In the Threat Prevention Overview pane, you can quickly see the gateways in your organization that are enforcing Anti-Bot, Anti-Virus, Threat Emulation, and malware details. Use the windows for the most urgent or commonly-used management actions.
* Anti-Spam and Mail - In this window you can configure enforcing gateways, enable database updates, and review and adjust your messaging security settings.
* Mobile Access - In this window you see the important current data for the Mobile Access Software Blade. Mobile Access gives remote users secure connectivity to read emails and access web applications.
* IPsec VPN - In this window you can easily see status and quickly access data for your VPNs.
* Compliance - The Compliance Overview pane shows the overall compliance status for your organization, providing information to help optimize security settings, and regulatory compliance requirements.
* QoS (Quality of Service) - In this window you can view and manage the QoS policy.
* Desktop - In this window you can view and modify the Desktop policy Rule Base.
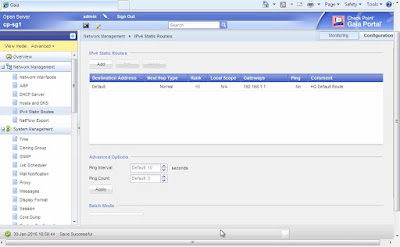
This is a continuation from my last post, I've configured the Security Gateway with an Inside and DMZ IP addresses, a default route and a login message (or banner).
I configured the SMS with a login banner message and downloaded the SmartConsole files by clicking on the Download Now button.
My PC installed some additional files to complete the SmartConsole installation.
If Custom is selected, it will show you a list of all the SmartConsole clients that will be installed.
The SmartConsole clients will be available on the PC program list. Open SmartDashboard and type the SMS IP address.
SmartDashboard will give a fingerprint hash which you can verify on the SMS CLI via the cpconfig command.
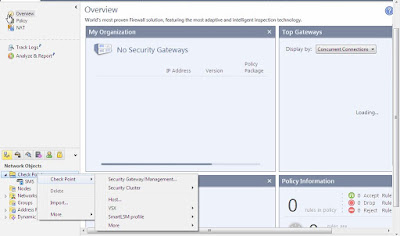
Add the Security Gateway under Firewall > Check Point > Security Gateway/Management > choose Classic Mode.
This is where the SIC password comes in. It must be the same on both the SMS and Security Gateway.
Initial SIC setup from the Security Gateway wizard.
You can start creating Network Objects on the SMS.
SmartDashboard
SmartDashboard is the SmartConsole client that lets you manage security policies and network objects.
In SmartDashboard, you can manage all aspects of your network security. The settings defined in the various tabs are applied to gateways and/or endpoints to enforce the security that you choose to implement.
The tabs that you see in the SmartDashboard may depend on the Software Blades that you have deployed
* Firewall - In this window you can see the important current data for the Firewall Software Blade and its Security Gateways.
* Application Control and URL Filtering - In the Application and URL Filtering Overview pane, you can quickly see the status of computers and incidents. Use the windows for the most urgely or commonly-used management actions.
* Data Loss Prevention (DLP) - In this window you can quickly see the status of DLP Security Gateways and Exchange Security Agents. You can also see incidents and access the windows for the most urgent or commonly used management actions.
* IPS (Intrusion Prevention System) - In this window you can quickly view and handle urgent security issues that deal with IPS management.
* Threat Prevention - In the Threat Prevention Overview pane, you can quickly see the gateways in your organization that are enforcing Anti-Bot, Anti-Virus, Threat Emulation, and malware details. Use the windows for the most urgent or commonly-used management actions.
* Anti-Spam and Mail - In this window you can configure enforcing gateways, enable database updates, and review and adjust your messaging security settings.
* Mobile Access - In this window you see the important current data for the Mobile Access Software Blade. Mobile Access gives remote users secure connectivity to read emails and access web applications.
* IPsec VPN - In this window you can easily see status and quickly access data for your VPNs.
* Compliance - The Compliance Overview pane shows the overall compliance status for your organization, providing information to help optimize security settings, and regulatory compliance requirements.
* QoS (Quality of Service) - In this window you can view and manage the QoS policy.
* Desktop - In this window you can view and modify the Desktop policy Rule Base.
This is a continuation from my last post, I've configured the Security Gateway with an Inside and DMZ IP addresses, a default route and a login message (or banner).
I configured the SMS with a login banner message and downloaded the SmartConsole files by clicking on the Download Now button.
My PC installed some additional files to complete the SmartConsole installation.
If Custom is selected, it will show you a list of all the SmartConsole clients that will be installed.
The SmartConsole clients will be available on the PC program list. Open SmartDashboard and type the SMS IP address.
SmartDashboard will give a fingerprint hash which you can verify on the SMS CLI via the cpconfig command.
Add the Security Gateway under Firewall > Check Point > Security Gateway/Management > choose Classic Mode.
Initial SIC setup from the Security Gateway wizard.
You can start creating Network Objects on the SMS.


Hi John
ReplyDeleteHow can I test the or simulate the CheckPoint Firewall in a LAB Environment ?
What kind of test or simulation you want to perform? i.e. Internet, NAT, site-to-site VPN?
ReplyDeleteJust read through my blog posts and you'll see ALL setup and testing scenarios I've done.